Using YOLO to track objects
YOLO (You Only Look Once) is a real-time object detection algorithm that predicts bounding boxes and class probabilities directly from an image in a single pass through a neural network. Unlike older methods that scan an image multiple times, YOLO processes the entire image at once, making it extremely fast and well-suited for many applications, including robotics.
A YOLO example using the AICA framework
This page details how to run a YoloExecutor component, i.e., a component that can use various YOLO models for
inference. It also demonstrates how it could be used as part of an AICA application. In the following paragraphs, we
show how to create a custom component which makes use of a bounding box to adapt an arm's motion such that it maintains
the object centered. The YoloExecutor component that is covered in following sections can be found under
components/advanced-perception with a valid AICA license.
Setup
Data folder
Create a directory with a name of your choice, say yolo-example-data, folder anywhere in your filesystem. Here, you
will be placing files that are required for runtime use. In following steps, you will configure AICA Launcher to mount
this directory for further use.
Camera calibration (optional)
For the purposes of this example, a camera calibration is not strictly required, but may be needed if you are using a high-distortion or fish-eye lens camera and do not have access to your camera's intrinsic parameters.
If this is your case, follow the camera calibration example to generate a camera intrinsics
file that you can then use with the CameraStreamer.
Obtaining YOLO inference models
The YoloExecutor component works with .onnx model files. However, many of the available YOLO models are widely
available in Pytorch (.pt) format instead. To convert between formats, you can use AICA's utilities to do so within
a Docker container and maintain your host system unpolluted.
First, clone our docker image repository (if you followed the calibration section, you should already have it!):
git clone https://github.com/aica-technology/docker-images.git && cd docker-images
then:
cd yolo_model_converter
./build-run.sh
By default, this will download and convert yolo12n for you (see here for
more models). If you wish to specify one of the other models that Ultralytics is offering, simply specify it as follows:
./build-run.sh --model yoloZZZZ
Once the script exits, copy the .onnx file that was generated in your yolo-example-data directory.
If you have ultralytics installed in your Python environment or you are willing to install it, then download any of
the models available here. For the purposes of this example, you can opt
for a smaller model such as the yolo12n.
To convert a .pt file to .onnx, run the following Python code with ultralytics installed:
from ultralytics import YOLO
model = YOLO("yolo12n.pt")
model.export(format="onnx")  # creates 'yolo12n.onnx'
This approach is also necessary if you are using custom models instead of the ones distributed by Ultralytics.
Class file
Along with the YOLO model from the previous paragraph, you will also need a class file (for example, coco.yaml)
that maps the numeric class IDs predicted by the model to their corresponding class names. This file is specific to the
model you are using and is typically defined during training, meaning that the mapping between class IDs and labels is
fixed once the model is trained.
Modifying the class file after training will not affect the model's behavior or predictions. It will only change the text labels displayed in your annotations. As a result, manual edits are generally safe but may lead to semantic inconsistencies if the names no longer match the model's intended classes.
For the purposes of this example, download the standard coco.yaml class
file here and move it to your
yolo-example-data folder, where you also stored your YOLO model.
AICA Launcher configuration
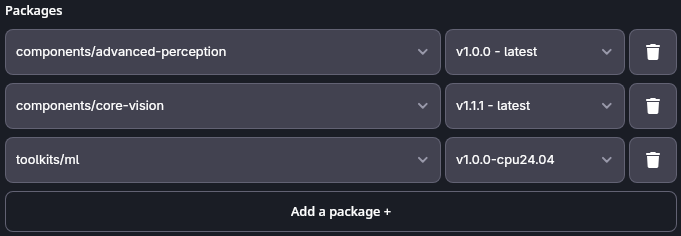
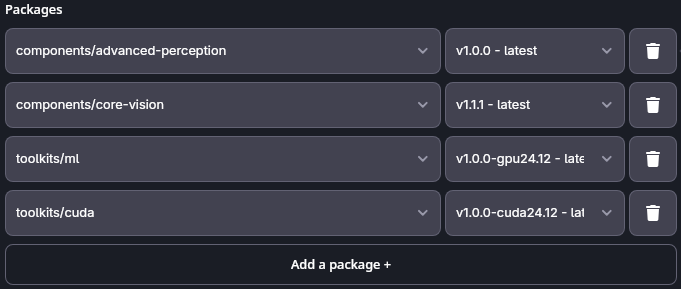
In AICA Launcher, create a configuration with the following core version and packages:
- AICA Launcher v1.4.1 or higher
- AICA Core v5.0.0 or higher
advanced_perceptionv1.0.0 or higher for theYoloExecutorcomponentcore-visionv1.1.1 or higher for theCameraStreamercomponent- CPU or GPU toolkit at v1.0.0 (subject to change in newer versions of
core-visionand/oradvanced-perception)
AICA toolkits are the curated way of bundling Machine Learning (ML) and GPU (specifically CUDA) acceleration libraries. In short:
- ML toolkits contain a broad range of libraries that are often required to conduct ML inference and/or training (e.g., pytorch, scipy, etc)
- CUDA toolkits contain libraries pertinent to interface CUDA-compatible code and libraries with a NVIDIA GPU.
If you do not own a GPU or want CPU accleration only, bundling our CUDA toolkits is not necessary. For instance, your AICA Launcher configuration could look as follows:
- CPU
- GPU
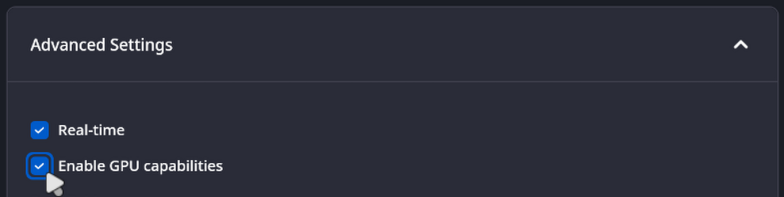
When using the CUDA toolkit, do not forget to enable GPU capabilities under the Advanced Settings menu:
Finally, you need to link your configuration to the yolo-example-data directory we created in earlier steps. While
you are still at the Advanced Settings menu:
- Click on Add a volume mount +.
- Click on Browse and navigate to the location of the
yolo-example-datafolder. - On the right side, where a
/targetplaceholder text is visible, type a name for the target directory inside your AICA container. For simplicity you can use/yolo-example-data.
Remember, AICA Launcher starts Docker containers with your selected configuration of packages, versions, advanced options, and volume mounts. Unless you explicitly specify volume mappings from your host system to the container, the container will not have access to the host filesystem.
An exception to this is the Data Folder that is prefilled by default, is created for you automatically (host), and is
mapped to /data internally. This folder contains the AICA database that preserves your applications and settings, but
can also be used to persistently store data, same as custom volume mounts.
Press Launch AICA Studio.
Using the YoloExecutor
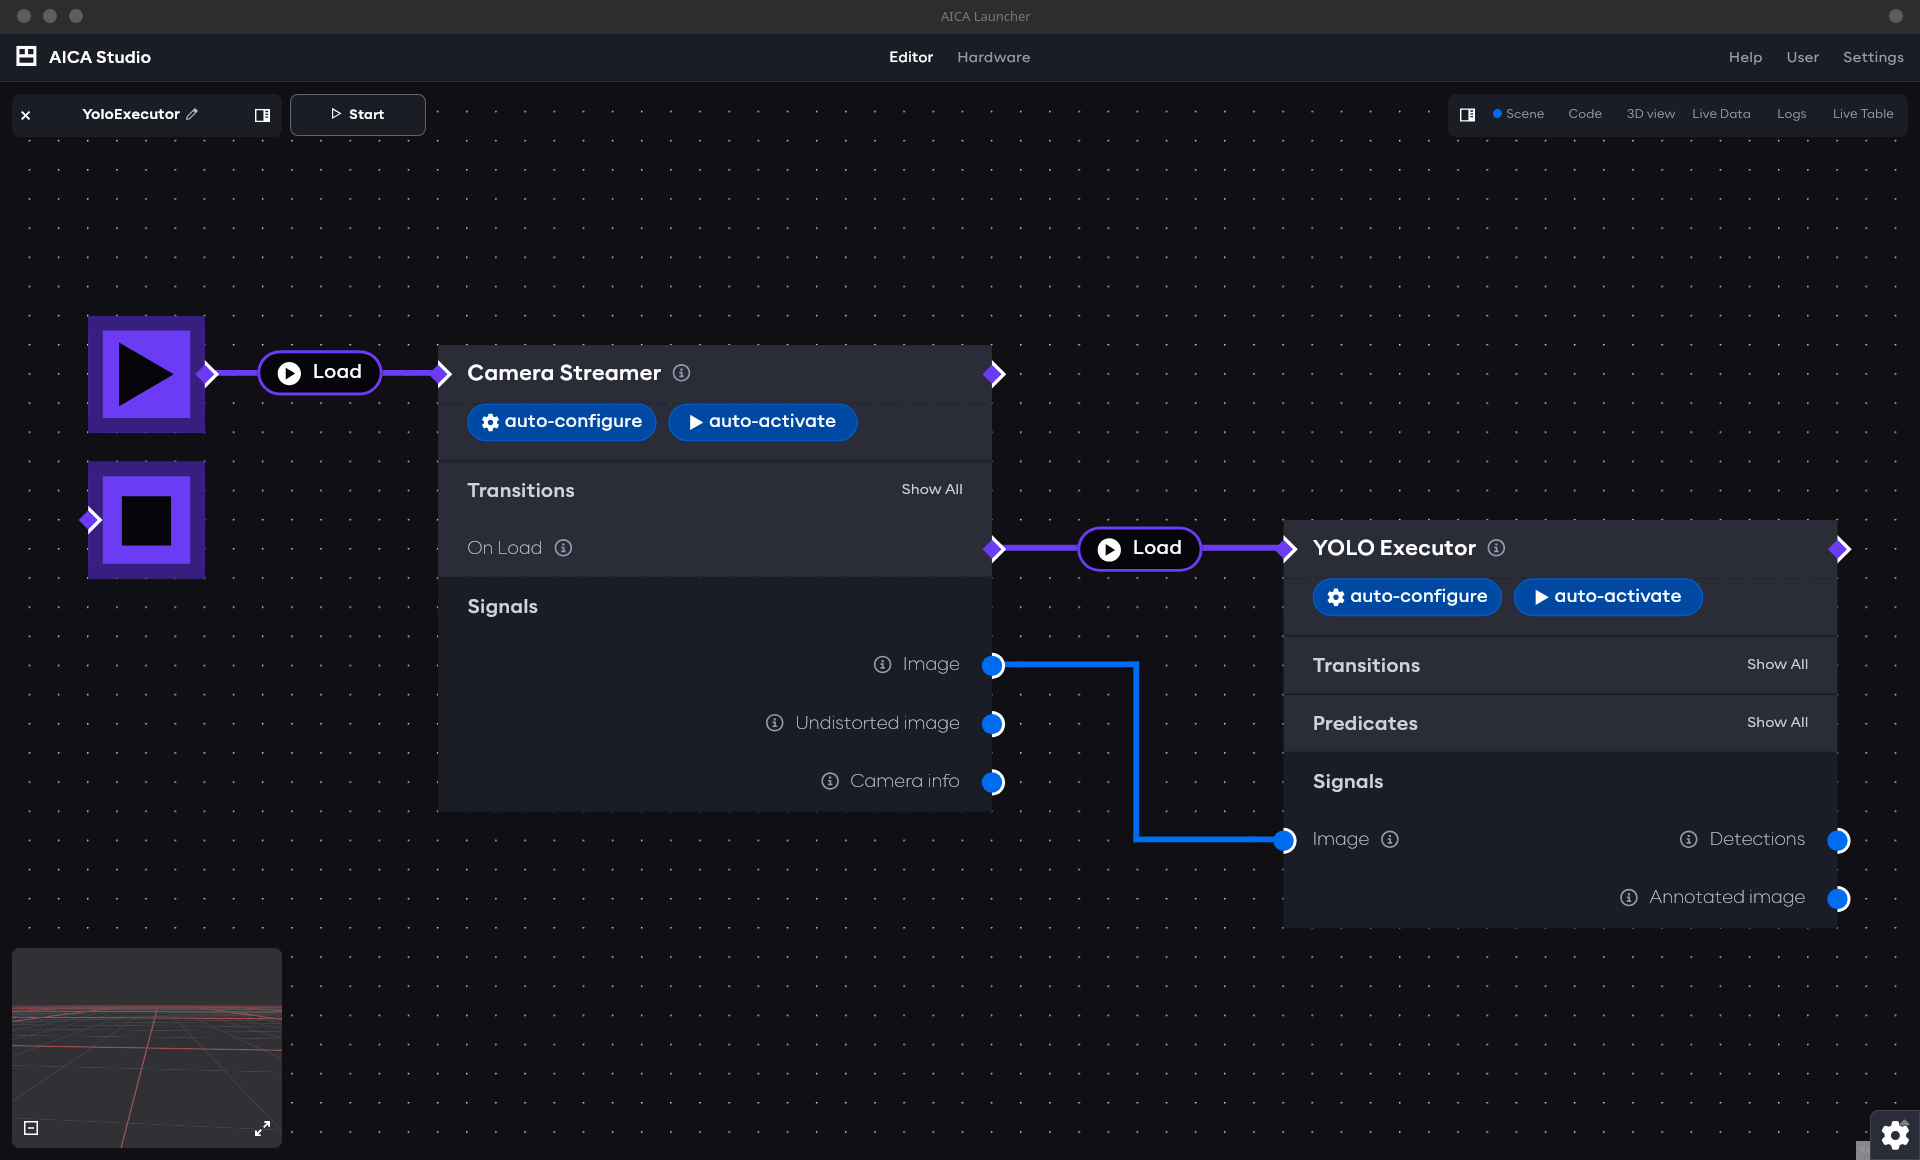
Let us build a YOLO application from scratch.
- Create a new application
- Remove the default Hardware Interface node for now
- Add the Camera Streamer component from the core vision package
- Set the
Sourceparameter to a video device or file accordingly - Enable auto-configure and auto-activate
- Set the
- Add the
YoloExecutorcomponent- Set the
Model pathparameter to the.onnxfile, e.g.,/yolo-example-data/yolo12n.onnx - Set the
Classes pathparameter to the yaml label file, e.g.,/yolo-example-data/coco.yaml - Enable auto-configure and auto-activate
- Set the
- Connect the output of the start node to each component to load them when the application is started
- Connect the
Imageoutput of the Camera Streamer to theImageinput of theYoloExecutor
Additional parameters can be used to tune the performance of YoloExecutor (both in the computational and prediction sense). The following picture shows the available parameters:
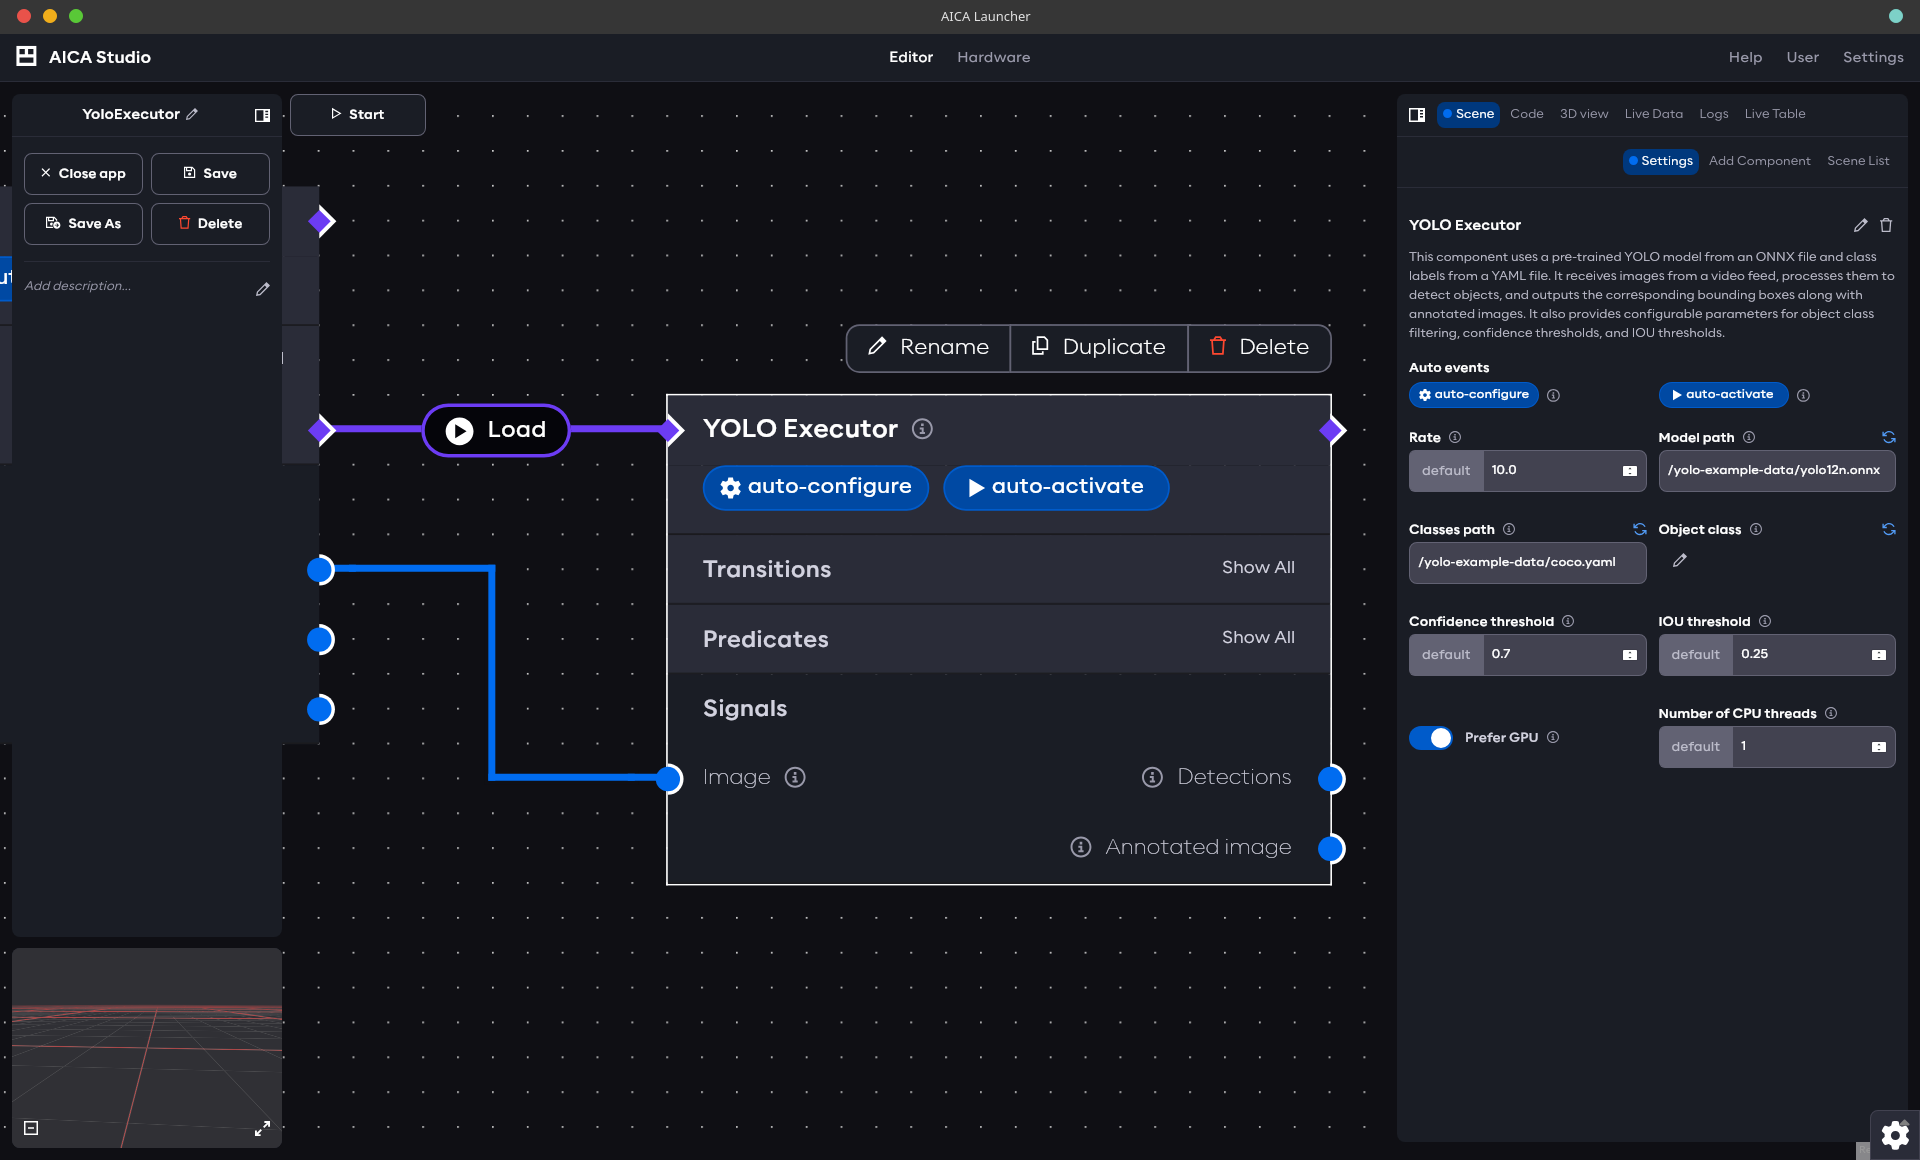
More specifically, you can adapt:
Model path: filepath to your YOLO modelClasses path: filepath to your classes file, making the mapping between predicted object IDs and object namesObject class: will narrow theDetectionsoutput to the selected classes alone (one or more classes included in the class file)Confidence threshold: the minimum score a predicted bounding box must have to be considered a valid detectionIOU Threshold: used during Non-Maximum Suppression (NMS) to decide whether two bounding boxes represent the same object. For example, ifIOU thresholdis set to 0.5, any box that overlaps more than 50% with a higher-scoring box will be discarded.Prefer GPU: sets GPU as the preferred inference device. However, if you use a CPU toolkit image withPrefer GPUtoggled on, then the component will ultimately gracefully fall back to using the CPUNumber of CPU threads: to get the most out of your system's resources. Notice that this parameter has no effect when a GPU is used
To complement the parameters and enable event-driven logic when using the component, two predicates exist, namely:
Is any selected class detected: True if one of the classes in theObject classlist is detectedIs any object detected: True if there is any known object (i.e., as per the class file provided) in the image stream (including but not limited toObject class)
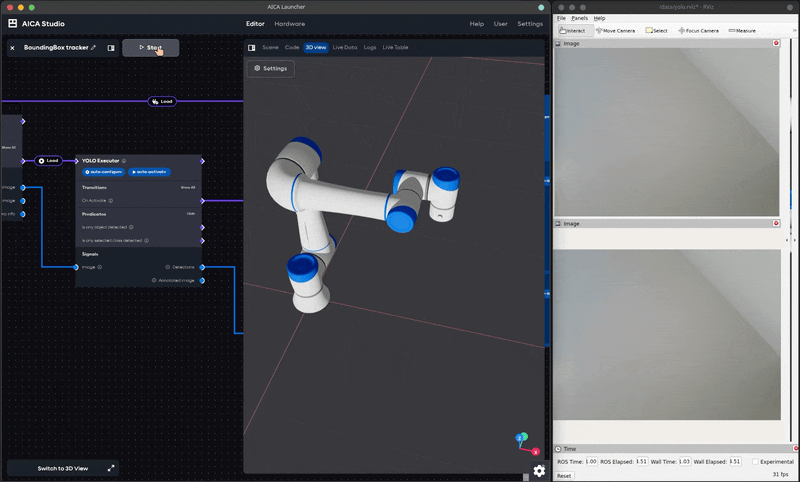
Your application should now look similar to the following picture:
Running the application
Open the application we built in the previous step, if you are not already there. Then:
- open RViz: select "Launch RViz" from the Launcher settings
- in RViz: press Add → By topic →
/yolo_executor/annotated_image/Imageto view the YOLO model's annotated output. It should show the camera images with bounding boxes drawn around key objects. The bounding boxes are published on theyolo_executor/detectionstopic asvision_msgs/msg/Detection2DArray, a ROS perception message (e.g., containing bounding box coordinates, class name, score, ...).
Only users with a Linux host can visualize the image stream with RViz. On macOS, AICA Launcher will not show the RViz option.
Tracking an object with YOLO
The bounding boxes generated by YOLO can be used to move a robot towards an object. Let us take an example were we will
emulate a camera mounted on a robot arm and we want to command the robot such that it tries to maintain a
selected object in the middle of the image frame. For simplicity, we specify a single object class for the YoloExecutor
to detect, and assume that only one object of the type can appear in the image at any time.
Creating a custom twist generator component
We first need to create a custom component that given a bounding box of an item will generate a twist indicating where the frame should move to keep the object centered. More information about custom components can be found here. The following component has been designed with regular off-the-self webcams and the standard YOLO models in mind, meaning:
- The object orientation is not taken into account when generating a twist. That is, no angular velocity is generated.
- No depth information is available and/or considered. The component operates in pixel space and is invariant to an object's movement along the depth axis. That is, only 2D motion will be observed, and the depth axis will have zero velocity.
Set up the repository
-
Create a git repository from the package-template
-
Clone the repository, enter the directory, and run:
./initialize_templates.shThis will launch a wizard to set up your package. Choose the following options:
- Package type:
Components - Package name:
object_detection_utils - Components to include:
Python Lifecycle
- Package type:
-
Rename
py_lifecycle_component.pytobounding_box_tracker.pyinsource/object_detection_utils/object_detection_utils/ -
Rename
object_detection_utils_py_lifecycle_component.jsontoobject_detection_utils_bounding_box_tracker.jsoninsource/object_detection_utils/component_descriptions/ -
Register the component in
source/object_detection_utils/setup.cfglike this:
[options.entry_points]
python_components =
    object_detection_utils::BoundingBoxTracker = object_detection_utils.bounding_box_tracker:BoundingBoxTracker
Component code
As discussed, the component expects a Detection2DArray as input (e.g. from YoloExecutor) containing, among other
things, a bounding box. From that bounding box, it generates a CartesianTwist which can be used to control a robot.
Below you will find the implementation of the component, which can be copied directly into your
bounding_box_tracker.py.
bounding_box_tracker.py
import numpy as np

from rclpy.lifecycle import LifecycleState
from vision_msgs.msg import Detection2DArray, Detection2D
from lifecycle_msgs.msg import State as LifecycleState

from modulo_components.lifecycle_component import LifecycleComponent
from modulo_core import EncodedState
import state_representation as sr


class BoundingBoxTracker(LifecycleComponent):
    def __init__(self, node_name: str, *args, **kwargs):
        super().__init__(node_name, *args, **kwargs)
        self._decay_rate: sr.Parameter = sr.Parameter("decay_rate", 1.0, sr.ParameterType.DOUBLE)
        self._twist = sr.CartesianTwist.Zero("object", "world")
        self._latest_twist = sr.CartesianTwist()
        self._reference_frame: str = ""
        self._camera_frame: str = ""

        self.add_parameter(
            sr.Parameter("image_size", [640, 480], sr.ParameterType.DOUBLE_ARRAY),
            "Image resolution [width, height] in pixels",
        )
        self.add_parameter(sr.Parameter("gains", [0.0001, 0.0001], sr.ParameterType.DOUBLE_ARRAY), "Control gains (Kp)")
        self.add_parameter(
            sr.Parameter("deadband", [15.0, 15.0], sr.ParameterType.DOUBLE_ARRAY),
            "Deadband for the error measurements [width, height], within which no twist is generated",
        )
        self.add_parameter("_decay_rate", "Exponential decay rate")
        self.add_parameter(
            sr.Parameter("reference_frame", sr.ParameterType.STRING),
            "Optional reference frame for the output twist. If not set, the camera frame will be used.",
        )

        self.add_input("detections", self._on_receive_detections, Detection2DArray)
        self.add_output("twist", "_twist", EncodedState)

        self.add_tf_listener()

    def on_validate_parameter_callback(self, parameter: sr.Parameter) -> bool:
        name = parameter.get_name()
        match name:
            case "image_size" | "deadband" | "gains":
                if len(parameter.get_value()) != 2:
                    self.get_logger().error(f"{name} must be a list of two floats")
                    return False
                if any(g < 0 for g in parameter.get_value()):
                    self.get_logger().error(f"{name} must be non-negative")
                    return False
            case "reference_frame":
                if not parameter.is_empty() and len(parameter.get_value()) == 0:
                    self.get_logger().error("Reference frame must be a non-empty string")
                    return False
            case "decay_rate":
                if parameter.get_value() < 0:
                    self.get_logger().error("Decay rate must be non-negative")
                    return False
        return True

    def on_activate_callback(self) -> bool:
        if not self.get_parameter("reference_frame").is_empty():  # type: ignore
            self._reference_frame = self.get_parameter_value("reference_frame")
        return True

    def on_step_callback(self) -> None:
        if len(self._camera_frame) == 0:
            self.get_logger().debug(
                "No detections received yet or no valid camera frame was found in the message",
                throttle_duration_sec=3.0,
            )
            return
        decay_factor = np.exp(-self._decay_rate.get_value() * self._latest_twist.get_age())
        twist = sr.CartesianTwist.Zero("object", self._camera_frame)
        twist.set_linear_velocity(np.array(self._latest_twist.get_linear_velocity()) * decay_factor)

        if len(self._reference_frame) > 0 and not self._camera_frame == self._reference_frame:
            try:
                tf = self.lookup_transform(self._camera_frame, self._reference_frame)
            except Exception as e:
                self.get_logger().error(f"Failed to lookup transform: {e}")
                return
            self._twist = tf * twist
        else:
            self._twist = twist

    def on_deactivate_callback(self) -> bool:
        self._camera_frame = ""
        self._reference_frame = ""
        return True

    def _on_receive_detections(self, msg: Detection2DArray):
        if self.get_lifecycle_state().state_id != LifecycleState.PRIMARY_STATE_ACTIVE:
            self.get_logger().debug("Component is not active. Ignoring incoming detections.", throttle_duration_sec=1.0)
            return

        image_size = self.get_parameter("image_size").get_value()  # type: ignore
        gains = self.get_parameter("gains").get_value()  # type: ignore

        if len(msg.detections) == 0:
            self.get_logger().warn(
                "No objects detected. Holding last known position with decay.", throttle_duration_sec=1.0
            )
            return
        elif len(msg.detections) > 1:
            self.get_logger().warn("Multiple objects detected. Tracking only the first one.", throttle_duration_sec=1.0)

        obj: Detection2D = msg.detections[0]  # type: ignore

        if self._camera_frame != obj.header.frame_id:
            self._twist = sr.CartesianTwist.Zero("object", self._camera_frame)
            self._latest_twist = sr.CartesianTwist.Zero("object", self._camera_frame)
        self._camera_frame = obj.header.frame_id

        if not self._reference_frame:
            self._twist.set_reference_frame(self._reference_frame)

        positions = {}
        positions[f"{obj.results[0].hypothesis.class_id}"] = np.asarray(  # type: ignore
            [obj.bbox.center.position.x, obj.bbox.center.position.y]
        )

        bbox = positions[list(positions.keys())[0]]
        width_error = bbox[0] - image_size[0] / 2
        height_error = bbox[1] - image_size[1] / 2
        vx = 0.0
        vy = 0.0
        if abs(width_error) > self.get_parameter("deadband").get_value()[1]:  # type: ignore
            vx = width_error * gains[0]
        if abs(height_error) > self.get_parameter("deadband").get_value()[0]:  # type: ignore
            vy = height_error * gains[1]

        self._latest_twist.set_linear_velocity(vx, vy, 0.0)
And its corresponding description file:
object_detection_utils_bounding_box_tracker.json
{
  "$schema": "https://docs.aica.tech/schemas/1-1-1/component.schema.json",
  "name": "Bounding box tracker",
  "description": {
    "brief": "Receive object detection messages and outputs a twist command to keep an object at the center of a camera's frame",
    "details": "This component receives Detection2DArray messages and computes a twist command for the detected object to remain at the center of the frame. The Z axis is not considered (i.e., only X-Y plane commands will be issued)."
  },
  "registration": "object_detection_utils::BoundingBoxTracker",
  "inherits": "modulo_components::LifecycleComponent",
  "inputs": [
    {
      "display_name": "Detections",
      "description": "Detection array containing bounding box information of detected objects",
      "signal_name": "detections",
      "signal_type": "other",
      "custom_signal_type": "vision_msgs::msg::Detection2DArray"
    }
  ],
  "outputs": [
    {
      "display_name": "Twist",
      "description": "The twist command",
      "signal_name": "twist",
      "signal_type": "cartesian_twist"
    }
  ],
  "parameters": [
    {
      "display_name": "Image size",
      "description": "Image resolution [width, height] in pixels",
      "parameter_name": "image_size",
      "parameter_type": "double_array",
      "default_value": "[640, 480]"
    },
    {
      "display_name": "Control gains",
      "description": "Control gains (Kp) for the twist command",
      "parameter_name": "gains",
      "parameter_type": "double_array",
      "default_value": "[0.0001, 0.0001]"
    },
    {
      "display_name": "Deadband",
      "description": "Deadband for the error measurements, within which no twist is generated",
      "parameter_name": "deadband",
      "parameter_type": "double_array",
      "default_value": "[15.0, 15.0]"
    },
    {
      "display_name": "Decay rate",
      "description": "Exponential decay rate for the twist (per second)",
      "parameter_name": "decay_rate",
      "parameter_type": "double",
      "default_value": "1.0"
    },
    {
      "display_name": "Reference frame",
      "description": "Optional reference frame for the output twist. If not set, the camera frame will be used.",
      "parameter_name": "reference_frame",
      "parameter_type": "string",
      "default_value": null,
      "optional": true
    }
  ]
}
Enter the component folder in terminal and run
docker build -f aica-package.toml -t object-detection-utils .
Next, edit the AICA Launcher configuration and enter object-detection-utils under Custom Packages. After launching,
you should see the Object detection utils package listed in the Add Component menu, as well as a BoundingBoxTracker
component under that menu.
Application setup
- Add the
BoundingBoxTrackercomponent to the previously configured application- Turn on auto-configure and auto-activate
- Set the
Rateto roughly match your camera's FPS, e.g., to 30 - Set the
Control gainsto values that are sensible for your robot and your desired responsiveness - Set
Deadband(i.e., a banded region of acceptable error within which no twist is generated) to your liking - Set the
Decay rate(i.e., the rate at which a twist will decay if no object is detected) per your application's needs
- Connect the
Detectionsoutput ofYoloExecutorto theDetectionsinput ofBoundingBoxTracker
Commanding the robot with the generated twist
Add a Hardware Interface node to the application and select the Generic six-axis robot arm in the URDF selection.
Press on the + button to add a new controller and select the IK Velocity Controller. Make sure to enable the
auto-configure and auto-activate options.
In your CameraStreamer component's settings, set the Camera frame parameter to tool0. This way, you are naively
assuming that your camera lens is attached at the center of the robot tool, hence allowing the controller to translate
the desired twist.
Back at your BoundingBoxTracker component, connect the Twist output of this component to the Command input of the
IK Velocity Controller.
If you are using one of the other robot models that AICA offers, make sure to change the Camera frame parameter to
your robot's end-effector frame, or to record a frame in world coordinates from the 3D Viz menu.
You are now all set to run this application. For reference and a quick visual validation, the final graph should look like the following picture:

If you copied the code from this example, the YoloExecutor will be set to track a pair of scissors across the
frame. Pick up a pair, play the application, and see how the robot adapts to your movements. Remember, in a real-world
scenario the camera would be attached to the robot and motion would stop as soon as the object was centered. Here,
however, the camera is fixed and motionless, so you have to position the object at the middle of your camera frame to
prevent the robot from moving in the 2D plane.
Once you have tested this application, go ahead and pick another object that is included in the
coco dataset and try again.
Some objects are easier to recognize than others, so you may have to adapt the YoloExecutor's parameters or even opt
for a larger YOLO model.
If you are planning to use this demo with a physical robot, additional logic and safety considerations may have to be made.
Application code
YAML application
schema: 2-0-6
dependencies:
  core: v5.0.0
on_start:
  load:
    - hardware: hardware
    - component: camera_streamer
components:
  yolo_executor:
    component: advanced_perception::object_detection::YoloExecutor
    display_name: YOLO Executor
    events:
      transitions:
        on_load:
          lifecycle:
            component: yolo_executor
            transition: configure
        on_configure:
          lifecycle:
            component: yolo_executor
            transition: activate
        on_activate:
          load:
            component: bounding_box_tracker
    parameters:
      rate:
        value: 30
        type: double
      model_file:
        value: /yolo-example-data/yolo12n.onnx
        type: string
      classes_file:
        value: /yolo-example-data/coco.yaml
        type: string
      object_class:
        value:
          - scissors
        type: string_array
      num_threads:
        value: 4
        type: int
    inputs:
      image: /camera_streamer/image
    outputs:
      detections: /yolo_executor/detections
  camera_streamer:
    component: core_vision_components::image_streaming::CameraStreamer
    display_name: Camera Streamer
    events:
      transitions:
        on_load:
          lifecycle:
            component: camera_streamer
            transition: configure
        on_configure:
          lifecycle:
            component: camera_streamer
            transition: activate
        on_activate:
          load:
            component: yolo_executor
    parameters:
      camera_frame:
        value: tool0
        type: string
    outputs:
      image: /camera_streamer/image
  bounding_box_tracker:
    component: object_detection_utils::BoundingBoxTracker
    display_name: Bounding box tracker
    events:
      transitions:
        on_load:
          lifecycle:
            component: bounding_box_tracker
            transition: configure
        on_configure:
          lifecycle:
            component: bounding_box_tracker
            transition: activate
    parameters:
      rate:
        value: 100
        type: double
      gains:
        value:
          - 0.001
          - 0.001
        type: double_array
    inputs:
      detections: /yolo_executor/detections
    outputs:
      twist: /yolo_to_marker/twist
hardware:
  hardware:
    display_name: Hardware Interface
    urdf: Generic six-axis robot arm
    rate: 100
    events:
      transitions:
        on_load:
          load:
            - controller: robot_state_broadcaster
              hardware: hardware
            - controller: ik_velocity_controller
              hardware: hardware
    controllers:
      robot_state_broadcaster:
        plugin: aica_core_controllers/RobotStateBroadcaster
        events:
          transitions:
            on_load:
              switch_controllers:
                hardware: hardware
                activate: robot_state_broadcaster
      ik_velocity_controller:
        plugin: aica_core_controllers/velocity/IKVelocityController
        inputs:
          command: /yolo_to_marker/twist
        events:
          transitions:
            on_load:
              switch_controllers:
                hardware: hardware
                activate: ik_velocity_controller
graph:
  positions:
    on_start:
      x: -20
      y: -360
    stop:
      x: -20
      y: -260
    components:
      yolo_executor:
        x: 740
        y: -180
      camera_streamer:
        x: 200
        y: -300
      bounding_box_tracker:
        x: 1400
        y: 180
    hardware:
      hardware:
        x: 1940
        y: -360
  edges:
    yolo_to_marker_marker_pose_signal_point_attractor_attractor:
      path:
        - x: 1360
          y: 520
        - x: 1360
          y: 680
    yolo_executor_detections_yolo_to_marker_json_input:
      path:
        - x: 1160
          y: 120
        - x: 1160
          y: 220
        - x: 860
          y: 220
        - x: 860
          y: 520
    yolo_to_marker_twist_hardware_hardware_ik_velocity_controller_command:
      path:
        - x: 1820
          y: 380
        - x: 1820
          y: 420
    yolo_executor_detections_yolo_to_marker_detections:
      path:
        - x: 1200
          y: 120
        - x: 1200
          y: 380
    yolo_executor_on_activate_bounding_box_tracker_bounding_box_tracker:
      path:
        - x: 1300
          y: 0
        - x: 1300
          y: 240
    yolo_executor_detections_bounding_box_tracker_detections:
      path:
        - x: 1220
          y: 120
        - x: 1220
          y: 400
    on_start_on_start_camera_streamer_camera_streamer:
      path:
        - x: 140
          y: -300
        - x: 140
          y: -240
    camera_streamer_image_yolo_executor_image:
      path:
        - x: 640
          y: -40
        - x: 640
          y: 120