Using Isaac Sim as a visualizer
This guide walks you through the steps required to set up NVIDIA Isaac Sim so it can interface with AICA Studio using OmniGraph and ROS 2. By the end of this tutorial, you’ll have a working simulation environment in Isaac Sim that communicates with AICA Studio over ROS 2.
NVIDIA Isaac Sim is a high-fidelity robotics simulator built on NVIDIA Omniverse. It provides realistic physics, multi-sensor support, and RTX-based rendering, making it ideal for developing, testing, and validating robot software before deploying to real hardware.
To connect Isaac Sim with AICA Studio, we will use ROS 2 Bridge, an extension that lets Isaac Sim publish and subscribe to ROS 2 topics and services. Through this bridge, we can exchange robot state, control commands, sensor data, and more between the simulator and AICA Studio.
OmniGraph is a visual, node-based programming system integrated into Isaac Sim. It lets you assemble logic and data flows, called Action Graphs, by connecting pre-built nodes. OmniGraph can include ROS 2 Bridge nodes, enabling communication between Isaac Sim and ROS 2 without writing code.
This interface can be used in two main ways:
-
Control a simulated robot in Isaac Sim from an AICA application: In this mode, an application running in AICA Studio controls a virtual robot hosted in Isaac Sim. The AICA application sends control inputs via ROS 2, and Isaac Sim feeds back the robot state and sensor data (e.g., joint states, poses, perception). From the AICA application’s point of view, the simulated robot behaves like real hardware, making this setup well suited for validating and debugging control algorithms before deploying them to a physical robot.
-
Visualize a robot in Isaac Sim from an AICA application: In this mode, an application running in AICA Studio controls a robot that is not in Isaac Sim (e.g., in a production environment, AICA's mock interface, URSim, ...). The robot’s state (such as joint positions) is streamed to Isaac Sim, which mirrors the robot’s motion in a virtual scene. Isaac Sim is used purely for visualization and does not participate in the control loop. This provides a live digital view of the robot for monitoring, debugging, and demonstration purposes.
In this guide, we will focus on the second use case: using Isaac Sim as a visualization tool for AICA Studio. We will set up a simple simulation environment in Isaac Sim with a robot model and create an OmniGraph that subscribes to joint commands from an AICA application via ROS 2.
Prerequisites
Begin by installing Isaac Sim using the official installation instructions. For AICA Core v5, ensure you have Isaac Sim v5 or later.
Isaac Sim supports multiple installation options, including workstation installation, container-based and cloud deployment. Choose the method that best fits your workflow. For this guide, we assume you have installed Isaac Sim locally using the workstation installation method.
After installation, launch Isaac Sim with the ROS 2 bridge enabled and set ROS 2 Jazzy as the active ROS distribution. To do this, run the following command:
cd <path-to-isaac-sim>
./isaac-sim.selector.sh
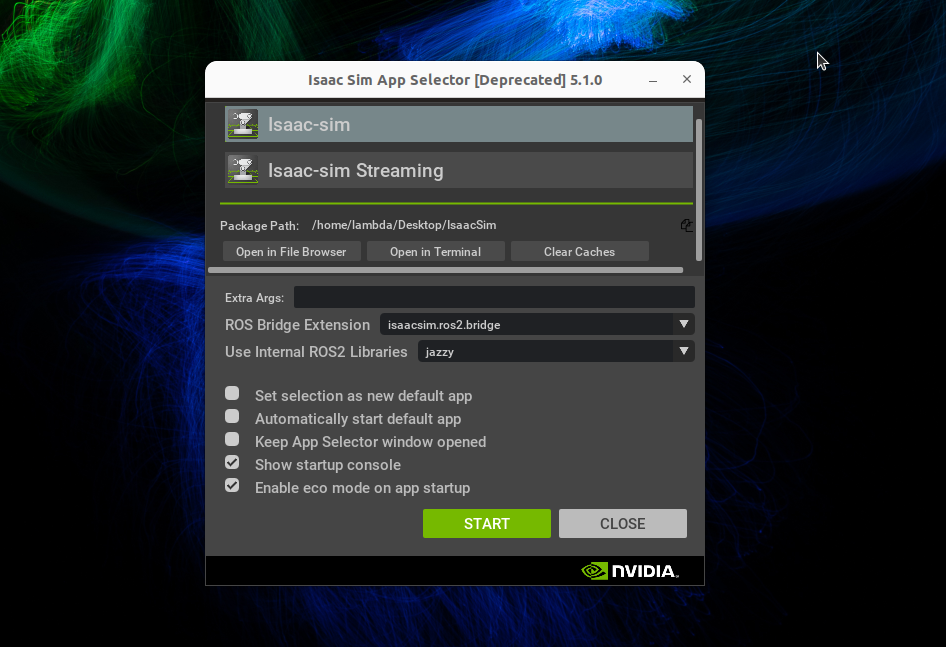
This command opens the Isaac Sim App Selector. In the Selector:
- Set
ROS Bridge Extensiontoisaacsim.ros2.bridge - Set
Use Internal ROS2 Librariestojazzy - Click Start
Setting up a simple simulation environment
Once Isaac Sim is running, you can create a simple simulation environment to test the AICA bridge. For this guide, we
will use a basic scene with a ground plane and a AICA's Generic robot model.
-
Create a new scene: In Isaac Sim, go to
File>Newto create a new scene. This will give an environment with a default lighting setup. -
Add a ground plane: To add a ground plane to the scene, go to
Create>Physics>Ground Plane. This will add a flat ground surface to the scene. -
Add a robot: To add AICA's
Genericrobot to the scene, first download theGenericrobot USD model from our repository into a local directory. Then, in Isaac Sim, go toContent>My Computerin the bottom left part of the screen and navigate to the directory where you saved theGenericrobot USD files. Drag and drop thegeneric.usdfile into the scene to add the robot.
Once down with these steps, your scene should look similar to the one below:
Setting up the OmniGraph
With the simulation environment set up, the next step is to add an action graph to your scene. This graph will handle the communication between Isaac Sim and AICA Studio using ROS 2.
In Isaac Sim, go to Create > Graphs > Action Graph to create a new OmniGraph. This will open the OmniGraph editor
in a new tab in the bottom part of the screen.
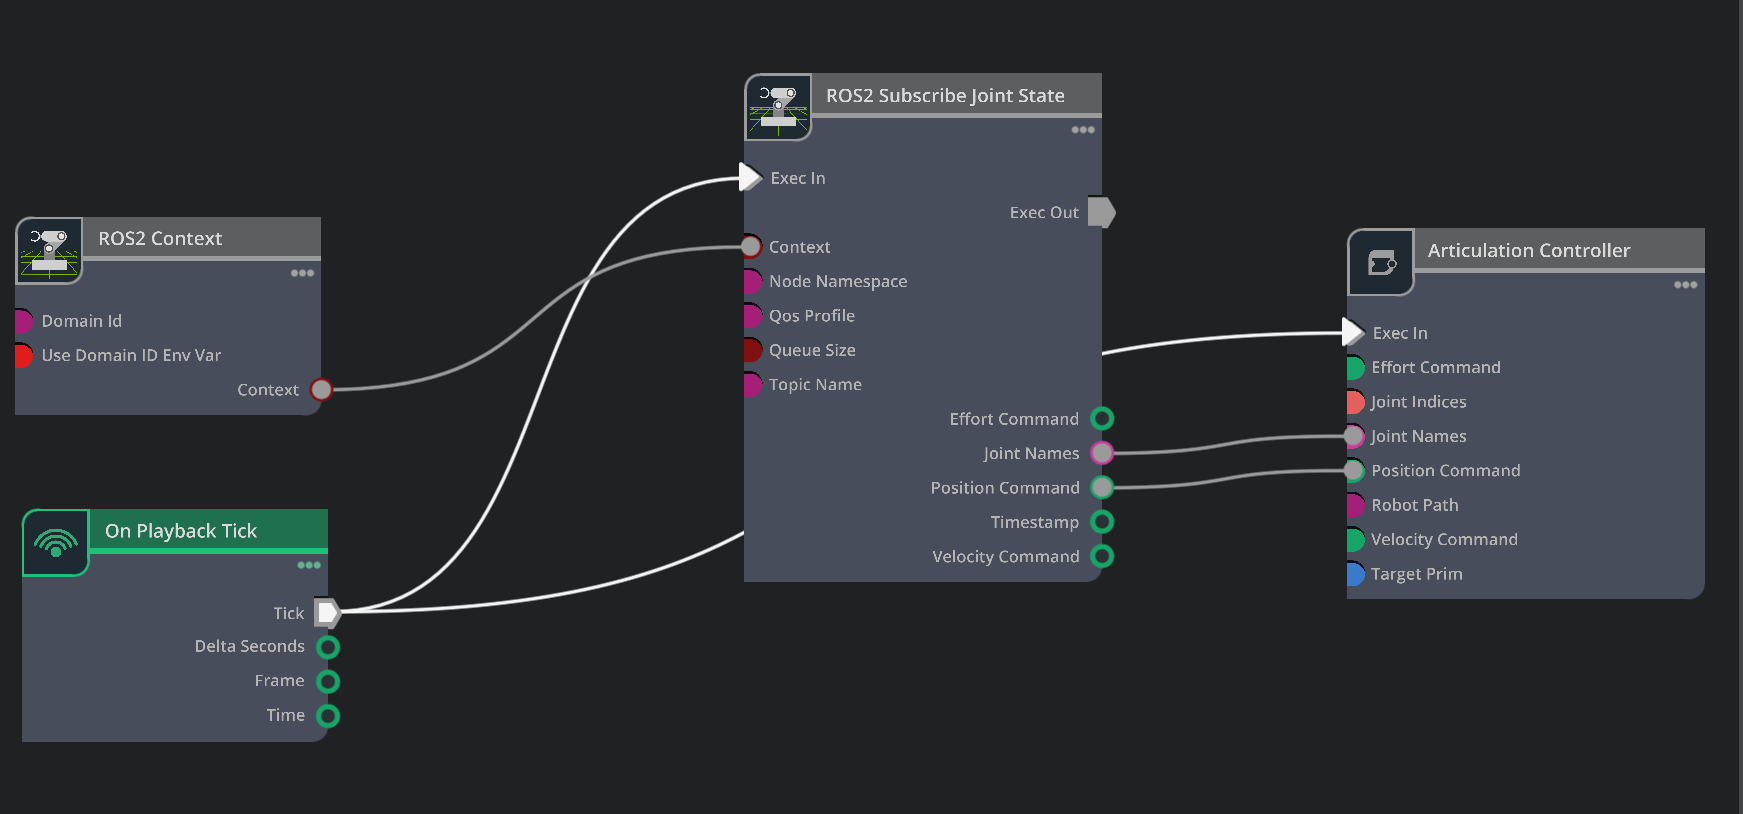
In the OmniGraph editor, you can create nodes and connect them. The following nodes are required to set up the communication between Isaac Sim and AICA Studio:
-
ROS2 Context: This node initializes the ROS 2 context and allows and defines the ROS 2 domain ID. In order to set the domain ID, double click on the node to open its properties and set the
Domain IDfield to30. This domain ID must match the one used by AICA Studio to ensure proper communication. -
ROS2 Subscribe Joint State: This node subscribes to the joint state topic published by AICA Studio. Set the
Topic Namefield to/joint_stateto match the topic used by AICA Studio for theGenericrobot. -
Articulation Controller: This node is responsible for controlling the robot's joints based on the received joint states. Select the
Genericrobot in the scene as theArticulationfor this node. -
On Playback Tick: This node triggers the graph execution on each simulation tick.
Now that you have all the necessary nodes, you can connect them as follows:
- Connect the
Contextsignal onROS 2 Contextnode's output to theContextsignal on theROS2 Subscribe Joint Statenode's input. - Connect the
Joint Namesoutput of theROS2 Subscribe Joint Statenode to theJoint Namesinput of theArticulation Controllernode. - Connect the
Joint Positionsoutput of theROS2 Subscribe Joint Statenode to thePosition Commandinput of theArticulation Controllernode. - Connect the
Tickoutput of theOn Playback Ticknode to theExecinput of theROS2 Subscribe Joint Statenode and theExecinput of theArticulation Controllernode.
Your OmniGraph should look similar to the image below:
Configuring the AICA Application
Using AICA Launcher, launch a configuration that uses the latest AICA Studio version and set the ROS 2 Domain ID to 30
to match the one set in Isaac Sim. No extra packages are required for this guide.
Copy the YAML content below into a new application in AICA Studio and save it. This application uses the Joint
Trajectory controller to move the Generic robot.
Joint Trajectory Control with Joint State publisher
schema: 2-0-6
dependencies:
  core: v5.1.0
frames:
  wp1:
    reference_frame: world
    position:
      x: 0.492159
      y: -0.020903
      z: 0.487698
    orientation:
      w: 0
      x: -0.707107
      y: 0.707107
      z: 0.000563
  wp2:
    reference_frame: world
    position:
      x: 0.492038
      y: 0.1335
      z: 0.336067
    orientation:
      w: 0.007248
      x: 0.70707
      y: -0.707064
      z: -0.007811
  wp3:
    reference_frame: world
    position:
      x: 0.491953
      y: 0.359307
      z: 0.229181
    orientation:
      w: 0
      x: -0.707107
      y: 0.707107
      z: 0.000563
on_start:
  load:
    - component: joint_signal_to_joint_state_message
    - hardware: hardware
components:
  joint_signal_to_joint_state_message:
    component: aica_core_components::ros::JointSignalToJointStateMsg
    display_name: Joint Signal To Joint State Message
    inputs:
      input: /hardware/robot_state_broadcaster/joint_state
    outputs:
      output: /joint_state
hardware:
  hardware:
    display_name: Hardware Interface
    urdf: Generic six-axis robot arm
    rate: 100
    events:
      transitions:
        on_load:
          load:
            - controller: robot_state_broadcaster
              hardware: hardware
            - controller: joint_trajectory_controller
              hardware: hardware
    controllers:
      robot_state_broadcaster:
        plugin: aica_core_controllers/RobotStateBroadcaster
        outputs:
          joint_state: /hardware/robot_state_broadcaster/joint_state
        events:
          transitions:
            on_load:
              switch_controllers:
                hardware: hardware
                activate: robot_state_broadcaster
        display_name: Robot State Broadcaster
      joint_trajectory_controller:
        plugin: aica_core_controllers/trajectory/JointTrajectoryController
        events:
          transitions:
            on_load:
              switch_controllers:
                hardware: hardware
                activate: joint_trajectory_controller
          predicates:
            has_trajectory_succeeded:
              call_service:
                controller: joint_trajectory_controller
                hardware: hardware
                service: set_trajectory
                payload: '{"times_from_start": [5, 7, 8], "frames": [wp1, wp2, wp3]}'
graph:
  positions:
    buttons:
      button:
        x: 360
        y: 780
    components:
      joint_signal_to_joint_state_message:
        x: 460
        y: 140
    hardware:
      hardware:
        x: 1060
        y: 0
  buttons:
    button:
      display_name: Trigger Events Button
      on_click:
        call_service:
          controller: joint_trajectory_controller
          hardware: hardware
          service: set_trajectory
          payload: '{"times_from_start": [5, 7, 8], "frames": [wp1, wp2, wp3]}'
  edges:
    on_start_on_start_joint_signal_to_joint_state_message_joint_signal_to_joint_state_message:
      path:
        - x: 280
          y: 60
        - x: 280
          y: 200
    hardware_hardware_joint_trajectory_controller_has_trajectory_succeeded_hardware_hardware_joint_trajectory_controller_set_trajectory:
      path:
        - x: 960
          y: 760
        - x: 960
          y: 840
    hardware_hardware_robot_state_broadcaster_joint_state_joint_signal_to_joint_state_message_input:
      path:
        - x: 440
          y: 460
        - x: 440
          y: 360
Additionally, the application has a Joint Signal To Joint State Message component that converts the robot joint state
to the message type expected by the Isaac Sim ROS bridge and broadcasts it to the /joint_state topic.
components:
  joint_signal_to_joint_state_message:
    component: aica_core_components::ros::JointSignalToJointStateMsg
    display_name: Joint Signal To Joint State Message
    inputs:
      input: /hardware/robot_state_broadcaster/joint_state
    outputs:
      output: /joint_state
Since Isaac Sim doesn't appear as a component in AICA Studio, the output topic of the translator component has to be edited manually in the code editor. Simply add the two highlighted lines above to configure the output to the matching topic name.
Validate the application by pressing Play in AICA Studio. You will see the robot moving between 3 waypoints defined in
the application wp1, wp2, and wp3.
Interfacing Isaac Sim with AICA Studio
Now that both Isaac Sim and AICA Studio are set up, you can run the simulation to see the communication in action.
-
Start AICA Application: First, ensure that your AICA application is running. You can do this by pressing the
Startbutton in AICA Studio. This will start broadcasting the robot's state to the/joint_statetopic. -
Start Isaac Sim: If all the steps above have been followed correctly, you just need to press the
Playbutton in Isaac Sim to start the simulation. The OmniGraph will start executing, and the robot in the scene will mirror the one from AICA Studio.